Introduction
Prerequisites
This workshop will not work on Windows systems.
You can use the Ubuntu VM we provide here (only works on VirtualBox).
The username and password are both ipwembedded.
The VM has the port 3033 forwarded for SSH connection.
If you want to have the VM home directory mounted in Windows, use the following commands (with Admin PowerShell):
winget install -e --id WinFsp.WinFsp
winget install -e --id SSHFS-Win.SSHFS-Win
net use X: \\sshfs\ipwembedded@localhost!3033
If you did not attend the Tock Workshop, please follow the Setup Tutorial.
Getting Started
For this track we will be using the Nucleo-F429ZI boards. You will need to change the branch you are working on, but first make sure you commit your changes.
git add .
git commit -m "tock workshop progress"
Then, to fetch the branch and work on it, run:
git fetch
git checkout track/embedded
The board's main can be found in the boards/nucleo_f429zi subfolder. Try to flash the kernel to the board, using the board's Makefile. After you are done flashing, connect to the board using tockloader listen
[INFO   ] No device name specified. Using default name "tock".
[INFO   ] No serial port with device name "tock" found.
[INFO   ] Found 2 serial ports.
Multiple serial port options found. Which would you like to use?
[0]     /dev/cu.debug-console - n/a
[1]     /dev/cu.usbmodem1303 - STM32 STLink

Which option? [0] 1
[INFO   ] Using "/dev/cu.usbmodem1303 - STM32 STLink".
[INFO   ] Listening for serial output.

tock$
Customize your kernel
After connecting to Tock's terminal, you can run help to see the supported commands. One of them is reset and by running it, you can see the default "welcome" message.
tock$ reset
Initialization complete. Entering main loop
tock$
Personalize your kernel, by changing the hostname and the welcome message.
Print Counter Capsule
For this task, you will need to build a capsule that prints a custom message each time it receives a print command from an application, along with a message counter representing the number of commands received. Remember that you will need to implement the SyscallDriver trait.
The simple way
Simplest method to do this is to add a counter field in the capsule's structure. One issue you will most likely encounter is that the command method required by the SyscallDriver trait has a immutable reference to &self, so you may need to wrap the counter in a wrapper that allows for inner mutability, such as Cell.
The Tock way
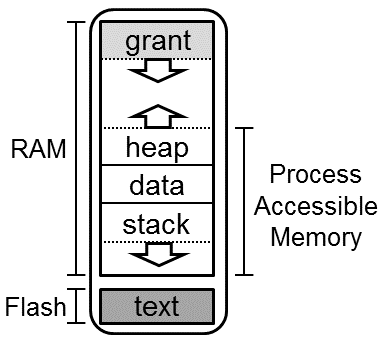
One issue with the previous approach is that the counter would be shared between the applications. This could be an issue for mutually distrustful application. Fortunately, Tock has a mechanism in place for such situations, called Grants, which are per-process memory regions allocated by the kernel in a process memory region for a capsule to store that process’s state.
To access this region, you can simply add a new grant field in the capsule structure.
use kernel::grant::{AllowRoCount, AllowRwCount, Grant, UpcallCount};

// TODO: Define `App` structure. Make sure to satisfy trait constraints.
struct App;

struct PrintCounter {
    grant: Grant<
        App,
        UpcallCount<0>,     // Number of upcalls supported by the capsule
        AllowRoCount<0>,    // Number of Read-Only buffers supported
        AllowRwCount<0>,    // Number of Read-Write buffers supported
    >,
}
As before, we will need to define a component for this capsule, to initialize it.
#[macro_export]
macro_rules! print_counter_component_static {
    ($(,)?) => {{
        kernel::static_buf!(capsules_extra::print_counter::PrintCounter)
    };};
}

pub struct PrintCounterComponent;

impl Component for PrintCounterComponent {
    type StaticInput = &'static mut MaybeUninit<capsules_extra::print_counter::PrintCounter>;

    type Output = &'static capsules_extra::print_counter::PrintCounter;

    fn finalize(self, static_memory: Self::StaticInput) -> Self::Output {
        todo!()
    }
}
Grants are a sensitive component of the operating system, so the creation and management operations are considered unsafe, and require
privileges to perform. Tock restricts these privileged operations through the use of capabilities, which are tokens implementing unsafe traits. Because capsules are forbidden from using unsafe code, these tokens cannot be forged.
Creating a grant is requires a reference to the board's kernel, and a driver number, so we will need to add these parts in the components.
pub struct PrintCounterComponent {
    driver_num: usize,
    board_kernel: &'static kernel::Kernel,
}

impl PrintCounterComponent {
    pub fn new(driver_num: usize, board_kernel: &'static kernel::Kernel) -> Self {
        Self {
            driver_num,
            board_kernel,
        }
    }
}
The capability needed for grant creating is called MemoryAllocationCapability, and it can be found in the kernel::capabilities module. The kernel also exposes the crate_capability! macro for ease of use.
impl Component for PrintCounterComponent {
    // ...

    fn finalize(self, static_memory: Self::StaticInput) -> Self::Output {
        let grant_cap = create_capability!(capabilities::MemoryAllocationCapability);
        let grant = self.board_kernel.create_grant(self.driver_num, &grant_cap);

        static_memory.write(capsules_extra::print_counter::PrintCounter::new(grant))
    }
}
new constructorYou will also need to implement the new constructor for the PrintCounter capsule.
Next, you must implement the SyscallDriver trait, where the command logic will be. For the allocate_grant method implementation, it is enough to use the enter method of the Grant which takes a closure with two parameters.
fn allocate_grant(&self, process_id: kernel::ProcessId) -> Result<(), kernel::process::Error> {
    self.grant.enter(process_id, |_, _| {})
}
For the command logic, you must also use the enter API. The first parameter of the closure will be a mutable reference to a GrantData wrapper over the previously defined App. The wrapper is transparent, meaning it permits accessing fields of the generic type.
The next step is configuring the capsule in the board's main file. Remember you need to add the capsule in the NucleoF429ZI structure, the SyscallDriverLookup and initialize the printer counter capsule.
The role of a Scheduler
This task aims to illustrate the importance of OS preemption in the context of untrusted applications. Currently the scheduler used by the board is kernel::scheduler::RoundRobinSched, which implements a classical scheduling algorithm, allowing each process to run up to a maximum time slice called quanta. In the event that an application tries starving all other processes, the kernel will interrupt the malicious application after its quanta expires and will then schedule another process.
Trust but verify
You will need to install openocd first.
# Linux
sudo apt install openocd

# Mac
brew install openocd
Your task will be to verify the previous claims, by flashing two C applications. One of them will be the blink example. After flashing the kernel by running make flash in the board's main directory (boards/nucleo_f429zi), you can load the application by running make flash in the example's root folder (example/blink).
As there are no "malicious" examples, we will have to add them on our own. In this case, an app that would print a message, then just infinitely spin in a while loop is enough. For this, you can adapt the examples/c_hello example, the flash it.
If you managed to flash both applications, you should be able to connect to the board using tockloader listen and see a similar output when running list:
tockloader listen
[INFO   ] No device name specified. Using default name "tock".
[INFO   ] No serial port with device name "tock" found.
[INFO   ] Found 2 serial ports.
Multiple serial port options found. Which would you like to use?
[0]     /dev/cu.debug-console - n/a
[1]     /dev/cu.usbmodem1103 - STM32 STLink

Which option? [0] 1
[INFO   ] Using "/dev/cu.usbmodem1103 - STM32 STLink".
[INFO   ] Listening for serial output.

tock$ list
 PID    ShortID    Name                Quanta  Syscalls  Restarts  Grants  State
 0      Unique     blink                    0       289         0   1/11   Yielded
 1      Unique     ws-demo                640         6         0   1/11   Running
tock$
You should be able to see the on-board LEDs flashing on the board.
Cooperation flaw
Now, let's test the same scenario, but with a cooperative scheduling mechanism. You have to first change the kernel's scheduler in the board's main.rs file to use the scheduler::cooperative::CooperativeSched. Then you must re-flash the kernel by running make flash. Fortunately flashing the kernel should preserve the applications, so you will not have to re-flash them as well.
After you are done flashing, check that both applications are present. You can try to reset the board a few times by running reset in tock's process console (the terminal you open by running tockloader listen).