Introduction
Prerequisites
This workshop will not work on Windows systems.
You can try following the guide using a Linux VM/WSL2,
or you can use the NixOS VM we provide here (only works on VirtualBox).
The username and password are both ipwembedded.
If you will be using the NixOS VM, you can skip the prerequisites.
Rust Toolchain
You will need to install the Rust toolchain. To do so, you can follow the instructions on the Getting started page of the Rust Language website.
To verify that the installation, open a terminal and run rustup --version. If everything went well, you should see an output similar to this:
rustup 1.28.1 (f9edccde0 2025-03-05)
info: This is the version for the rustup toolchain manager, not the rustc compiler.
info: The currently active `rustc` version is `rustc 1.86.0 (05f9846f8 2025-03-31)`
probe-rs install
This tool is an embedded debugging and target interaction toolkit. It enables its user to program and debug microcontrollers via a debug probe.
The simplest installation method involves using the cargo packet manager, but first you have to install the prerequisites:
- On Debian-based Linux, use the following command:
sudo apt install -y pkg-config libudev-dev cmake git
- On Mac OS, no additional setup is needed.
After that, use cargo to install probe-rs:
cargo install [email protected] --locked
The lastest probe-rs version does not work with the PSoC 6 board, we have to use an older version, 0.29.1.
If you are using Linux, you will also need to add this udev file in /etc/udev/rules.d. Then, run as root:
udevadm control --reload # to ensure the new rules are used.
udevadm trigger # to ensure the new rules are applied to already added devices.
arm-none-eabi toolchain
You will need to install the ARM toolchain in order to compile applications written in C. You can find the pre-built binary archives on the ARM Downloads Page. Alternatively, if you are on Linux, you can install it by running the following command in terminal:
sudo apt install gcc-arm-none-eabi
tockloader
The tockloader tool is a useful and versatile tool for managing and installing applications on Tock. In order to install it, you will need to have Python installed. You can download the latest version of on the official website. You will also need to install pipx, following the installation guide. Then you can install it by running:
pipx install tockloader
pipx ensurepath
CY8CPROTO-062-4343W board
Microcontroller
- PSoC 6 Dual-Core MCU
- ARM Cortex-M4 (150 MHz) + ARM Cortex-M0+ (100 MHz)
- 1 MB Flash, 288 KB SRAM
- Ultra-low power consumption
Wireless Connectivity
- CYW4343W Module
- Wi-Fi 802.11 b/g/n
- Bluetooth 4.1 (Classic + BLE)
- Integrated antenna
Boards Provided by

Tock
Tock is an open-source embedded operating system for microcontrollers written in Rust. The operating system is designed to isolate components so untrusted third-party applications can run in a protected environment. Tock supports multiple platforms, such as RISC-V, Cortex-M or X86.
Architecture
Tock uses a microkernel architecture: complex drivers and services are often implemented as untrusted processes, which other processes, such as applications, can invoke through inter-process communication (IPC). Tock supports running multiple, independent applications written in any compiled language.
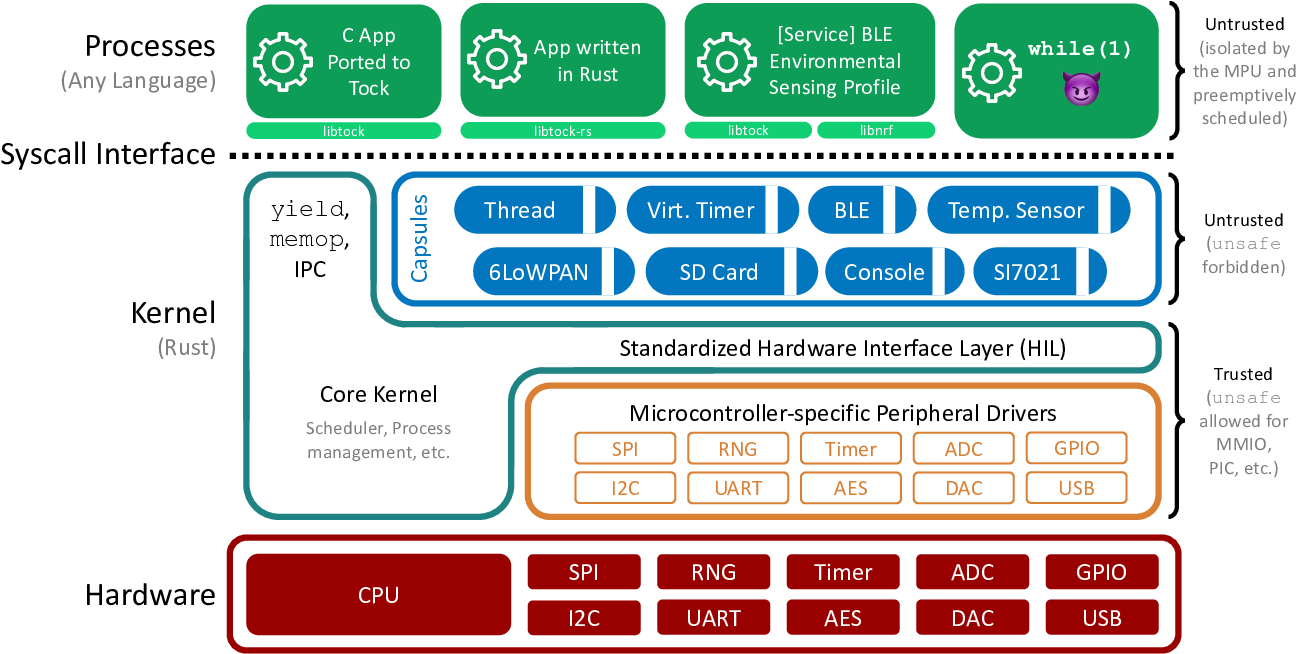
The above Figure shows Tock's architecture. Code falls into one of three categories: the core kernel, capsules, and processes.
The core kernel and capsules are both written in Rust. Rust is a type-safe systems language; other documents discuss the language and its implications to kernel design in greater detail, but the key idea is that Rust code can't use memory differently than intended (e.g., overflow buffers, forge pointers, or have pointers to dead stack frames). Because these restrictions prevent many things that an OS kernel has to do (such as access a peripheral that exists at a memory address specified in a datasheet), the very small core kernel is allowed to break them by using "unsafe" Rust code. Capsules, however, cannot use unsafe features. This means that the core kernel code is very small and carefully written, while new capsules added to the kernel are safe code and so do not have to be trusted.
Processes can be written in any language. The kernel protects itself and other processes from bad process code by using a hardware memory protection unit (MPU). If a process tries to access memory it's not allowed to, this triggers an exception. The kernel handles this exception and kills the process.
The kernel provides four major system calls:
command: makes a call from the process into the kernelsubscribe: registers a callback in the process for an upcall from the kernelallow: gives kernel access to memory in the processyield: suspends process until after a callback is invoked
Every system call except yield is non-blocking. Commands that might take a long time (such as sending a message over a UART) return immediately and issue a callback when they complete. The yield system call blocks the process until a callback is invoked; userland code typically implements blocking functions by invoking a command and then using yield to wait until the callback completes.
The command, subscribe, and allow system calls all take a driver ID as their first parameter. This indicates which driver in the kernel that system call is intended for. Drivers are capsules that implement the system call.
Hands-on Workshop
Flashing the kernel
Initially, you will need to clone the Tock repository:
git clone https://github.com/OxidosAutomotive/tock.git --branch=psoc6-workshop
cd tock
You don't have to clone the Tock OS repository, it is already cloned in the home directory.
You will have to run nix-shell once you enter the tock directory.
The configuration for the various boards supported can be found in the boards directory. To compile the kernel, you can use the cargo flash utility.
cd boards/cy8cproto_62_4343_w
make flash
Alternatively, you can use the cargo flash while inside the board's directory.
If you did everything correctly, you should be able to use the tockloader listen command to interact with the kernel. When prompted to select a serial port, pick the one that ends with KitProg3 CMSIS-DAP.
Currently, tockloader doesn't work on NixOS, but we have included the program picocom
which you can use with the following command: picocom -b 115200 /dev/ttyACM0. (use sudo if it gives an error about permissions)
cargo flash
Alternatively, you can use the `make flash` while inside the board's directory.

If you did everything correctly, you should be able to use the `tockloader listen` command to interact with the kernel. When prompted to select a serial port, pick the one that ends with `KitProg3 CMSIS-DAP`.

```shell
tockloader listen
[INFO   ] No device name specified. Using default name "tock".
[INFO   ] No serial port with device name "tock" found.
[INFO   ] Found 2 serial ports.
Multiple serial port options found. Which would you like to use?
[0]     /dev/cu.debug-console - n/a
[1]     /dev/cu.usbmodem1103 - KitProg3 CMSIS-DAP

Which option? [0] 1
[INFO   ] Using "/dev/cu.usbmodem1103 - KitProg3 CMSIS-DAP".
[INFO   ] Listening for serial output

tock$
Compiling an application
For this task, you will have to clone the libtock-c repository:
git clone https://github.com/ipworkshop/libtock-c.git --branch=remove-risc
cd libtock-c
You don't have to clone the libtock-c repository, it is already cloned in the home directory.
You will have to run nix-shell once you enter the libtock-c directory.
Make sure you don't run that command if you already ran nix-shell inside another directory (either run exit before, or use another shell).
Navigate to the examples/blink folder and take a look at the C application structure found in main.c. To compile the application, simply run make. This command will built the example applications for all target architectures supported by the library. Apps are compiled into TBFs (Tock Binary Format), and can be found in the build/<arch> sub-directories. Tock also generates an archive of the same app, compiled for multiple architectures, for ease of use and portability, called a TAB(Tock Application Bundle) which can be loaded using the tockloader utility.
Flashing the application
Unfortunately, the board is not currently supported by the tockloader project, so we will have to resort to bundling the kernel and application in a single binary and flashing it. The board you are using is a dual-core, with Tock running on the CortexM0+ core, so the correct TBF can be found at examples/blink/build/cortex-m0/cortex-m0.tbf. You will need to specify the path to the compiled application in the board's Makefile.
APP=../../libtock-c/examples/sensors/build/cortex-m0/cortex-m0.tbf
Then, run the make program command in terminal. It will use the arm-none-eabi-objcopy to merge the two binaries, and load it on the board. After the binary is flashed, you should see the on board LED blinking, and you should be able to see blink in the apps list, using tockloader listen.
tockloader listen
[INFO   ] No device name specified. Using default name "tock".
[INFO   ] No serial port with device name "tock" found.
[INFO   ] Found 2 serial ports.
Multiple serial port options found. Which would you like to use?
[0]     /dev/cu.debug-console - n/a
[1]     /dev/cu.usbmodem1103 - KitProg3 CMSIS-DAP

Which option? [0] 1
[INFO   ] Using "/dev/cu.usbmodem1103 - KitProg3 CMSIS-DAP".
[INFO   ] Listening for serial output

tock$ list
 PID    ShortID    Name                Quanta  Syscalls  Restarts  Grants  State
 0      Unique     blink                    0        84         0   1/ 8   Yielded
Building a capsule
A capsule is a kernel component acting as a device driver, or system service capsule. Capsules sit between the low-level drivers of the core kernel and use the HIL traits to interact with them, and the userspace applications, which utilizes its SyscallDriver interface. For this task, we will build a MockCapsule, that will print a debug message on application command.
The first step is to define the MockCapsule driver, and implement the SyscallDriver. You can create a new module in the capsules/extra crate named mock.rs. We also will need to chose an unused driver number to use (0x9000A will work).
use kernel::{
    syscall::{CommandReturn, SyscallDriver},
    ErrorCode,
};

pub const DRIVER_NUM: usize = 0x9000A;

pub struct MockCapsule;

impl SyscallDriver for MockCapsule {
    fn command(
        &self,
        command_num: usize,
        _: usize,
        _: usize,
        _process_id: kernel::ProcessId,
    ) -> kernel::syscall::CommandReturn {
        match command_num {
            _ => CommandReturn::failure(ErrorCode::NOSUPPORT),
        }
    }

    fn allocate_grant(&self, _process_id: kernel::ProcessId) -> Result<(), kernel::process::Error> {
        // No-op implementation
        Ok(())
    }
}
Do not forget to add pub mod mock; in capsules/extra/src/lib.rs.
The next step is to implement the handling of specific commands. The convention is that the first command (0) to be an "exists" command, that is usually used to check wether a driver is present or not in the board configuration, and it should simply return a CommandReturn::success().
We also need to add our print command, on command number 1. For serial debug printing, the kernel exposes two macros, kernel::debug! and kernel::debug_verbose!. Try to use both of them and spot the difference.
With our capsule implementation done, we need to add it to the board's configuration. We need to add a field for the capsule in the board's Cy8cproto0624343w structure.
/// Supported drivers by the platform
pub struct Cy8cproto0624343w {
    // ... Previous lines removed for simplicity
    systick: cortexm0p::systick::SysTick,
    mock_capsule: &'static capsules_extra::mock::MockCapsule,
}

impl SyscallDriverLookup for Cy8cproto0624343w {
    fn with_driver<F, R>(&self, driver_num: usize, f: F) -> R
    where
        F: FnOnce(Option<&dyn kernel::syscall::SyscallDriver>) -> R,
    {
        match driver_num {
            // ...
            capsules_core::gpio::DRIVER_NUM => f(Some(self.gpio)),
            capsules_extra::mock::DRIVER_NUM => f(Some(self.mock_capsule)),
            _ => f(None),
        }
    }
}

// ...

pub unsafe fn main() {
    // ...

    let cy8cproto0624343w = Cy8cproto0624343w {
        // ...
        gpio,
        // Currently, the CPU runs at 8MHz, that being the frequency of the IMO.
        systick: cortexm0p::systick::SysTick::new_with_calibration(8_000_000),
        mock_capsule: &capsules_extra::mock::MockCapsule,
    };

    // ...
}
Writing an application
To test the capsule we just created, we will need an application. This app will check if the driver is present in the kernel configuration, then it will issue a "print" command to the driver every second.
The simplest way to do this is to create a new entry in the examples directory, then import the Makefile from the blink example. We will also need to create an API for issuing commands to the capsule. This is usually done in a separate .c file, and further exposed in a header file to be used by application developers, but for the task at hand, defining them in main.c will work.
#include <libtock/tock.h>

#define MOCK_DRIVER_NUM 0x9000A
#define MOCK_EXIST 0x0
#define MOCK_PRINT 0x1

int check_mock_driver_exists(void);
int mock_print(void);

int check_mock_driver_exists(void) {
  syscall_return_t ret = command(MOCK_DRIVER_NUM, MOCK_EXIST, 0, 0);
  return tock_command_return_novalue_to_returncode(ret);
}

int mock_print(void) {
  syscall_return_t ret = command(MOCK_DRIVER_NUM, MOCK_PRINT, 0, 0);
  return tock_command_return_novalue_to_returncode(ret);
}

int main(void) {
}
tock.h APIThe syscall_return_t type is the representation of the CommandReturn type seen in kernel. Tock supports returning either a success or error response to system calls, along with a payload of up to two u32s in size. The developer must be aware of the return type used by a respective command of a driver to correctly decode the response message. In our case, both commands used return no payload so the tock_command_return_novalue_to_returncode.
Now, we need to complete the implementation of the main function.
#include <libtock/tock.h>

#include <libtock-sync/services/alarm.h>

// Headers for `printf`
#include <stdio.h>
#include <stdlib.h>
#include <string.h>
#include <unistd.h>

// ...

int main(void) {
  printf("Mock capsule test\n");

  int err = check_mock_driver_exists();
  if (err < 0) {
    printf("Mock capsule missing");
    return err;
  }

  while (true) {
    mock_print();
    // This delay uses an underlying alarm in the kernel.
    libtocksync_alarm_delay_ms(1000);
  }
}
To test the application, run the make command in the example's root directory, change the APP Makefile variable in the board's directory and run make program.
Periodic Print
We want to modify the capsule now, so that it prints a message every second, without the application's intervention. First we must modify the Mock capsule structure, to include a reference to an "Alarm source". To do so, we should make the structure generic over any implementor of the hil
use kernel::hil::time;

pub struct MockCapsule<'a, A: time::Alarm<'a>> {
    alarm: &'a A,
}

impl<'a, A: time::Alarm<'a>> MockCapsule<'a, A> {
    pub fn new(alarm: &'a A) -> Self {
        Self { alarm }
    }
}

// ...
impl blockDo not forget to change the SyscallDriver implementation block to use the newly added generic and lifetime.
Tock Alarm design
Tock is asynchronous by design, and any time consuming operation, such as adding delays in code, must not block the execution of the kernel. Non-blocking delays using a callback based mechanism, where the piece of code that must await a period of time arms an alarm using the interface exposed by the time::Alarm trait, and the underlying alarm will call a previously defined function at the expiration moment. The function to be invoked is specified by implementing the time::AlarmClient, and is the sole method alarm.
In our case, the implementation is straight forward. The capsule will print a message, and then re-arm the alarm:
use kernel::hil::time::ConvertTicks;

// ...

impl<'a, A: time::Alarm<'a>> MockCapsule<'a, A> {
    pub fn new(alarm: &'a A) -> Self { /* ... */}

    // We must also add an `init` function to start this cycle.
    pub fn init(&'a self) {
        let dt = self.alarm.ticks_from_seconds(1);
        self.alarm.set_alarm(self.alarm.now(), dt);
    }
}

impl<'a, A: time::Alarm<'a>> AlarmClient for MockCapsule<'a, A> {
    fn alarm(&self) {
        kernel::debug!("Periodic \"hi\" message");
        let dt = self.alarm.ticks_from_seconds(1);
        self.alarm.set_alarm(self.alarm.now(), dt);
    }
}
Component system
In Tock, initializing a board mainly consists of three steps:
- Setting any MCU-specific configurations necessary for the MCU to operate correctly.
- Statically declaring memory for various kernel resources (i.e. capsules) and configuring the capsules correctly.
- Loading processes, configuring the core kernel, and starting the kernel.
Components are designed to simplify the second step (configuring capsules) while also reducing the chance for misconfiguration or other setup errors. A component encapsulates peripheral-specific and capsule-specific initialization for the Tock kernel in a factory method, which reduces repeated code and simplifies the boot sequence.
The Component trait encapsulates all of the initialization and configuration of a kernel extension inside the Component::finalize() function call. The Component::Output type defines what type this component generates. Note that instantiating a component does not instantiate the underlying Component::Output type; instead, the memory is statically allocated and provided as an argument to the Component::finalize() method, which correctly initializes the memory to instantiate the Component::Output object. If instantiating and initializing the Component::Output type requires parameters, these should be passed in the component's new() function.
Using a component is as follows:
let obj = CapsuleComponent::new(configuration, required_hw)
    .finalize(capsule_component_static!());
All required resources and configuration is passed via the constructor, and all required static memory is defined by the [name]_component_static!() macro and passed to the finalize() method.
As mentioned before, the capsule will need an alarm source. Most microcontrollers do not have an abundance of hardware sources to fulfill the needs of every scenario, so there is a need to multiplex one or more time-sources to be able to configure multiple alarms. Tock has support for this through VirtualMuxAlarms which act as alarm sources but all multiplex a single MuxAlarm, backed by a board's peripheral.
The component must receive a static reference to a generic MuxAlarm, and should create and setup a new virtual alarm instance, whose client must be the mock capsule it will generate. As a result, the component will need a static memory regions (StaticInput type) for both the MockCapsule and the VirtualMuxAlarm.
pub struct MockCapsuleComponent<A: 'static + Alarm<'static>> {
    alarm_mux: &'static MuxAlarm<'static, A>,
}

impl<A: 'static + Alarm<'static>> MockCapsuleComponent<A> {
    pub fn new(alarm_mux: &'static MuxAlarm<'static, A>) -> Self {
        Self { alarm_mux }
    }
}

impl<A: 'static + Alarm<'static>> Component for MockCapsuleComponent<A> {
    type StaticInput = (
        &'static mut MaybeUninit<VirtualMuxAlarm<'static, A>>,
        &'static mut MaybeUninit<MockCapsule<'static, VirtualMuxAlarm<'static, A>>>,
    );

    type Output = &'static MockCapsule<'static, VirtualMuxAlarm<'static, A>>;

    fn finalize(self, static_memory: Self::StaticInput) -> Self::Output {
        let virtual_alarm = static_memory.0.write(VirtualMuxAlarm::new(self.alarm_mux));
        virtual_alarm.setup();

        let mock = static_memory.1.write(MockCapsule::new(virtual_alarm));
        virtual_alarm.set_alarm_client(mock);

        mock
    }
}
Do not forget to add pub mod mock; in boards/components/src/lib.rs.
The allocation of the memory segments is usually done through a marco. It is out of this workshop's scope to dive into writing macros, but the macro bellow takes a type that must implement the hil::time::Alarm trait and returns a tuple of static mutable references to MaybeUninit wrappers of the VirtualMuxAlarm nad the MockCapsule.
// ...

#[macro_export]
macro_rules! mock_component_static {
    ($A:ty $(,)?) => {{
        let virtual_alarm = kernel::static_buf!(
            capsules_core::virtualizers::virtual_alarm::VirtualMuxAlarm<'static, $A>
        );

        let mock = kernel::static_buf!(
            capsules_extra::mock::MockCapsule<'static, VirtualMuxAlarm<'static, $A>>
        );

        (virtual_alarm, mock)
    };};
}
MaybeUninitMaybeUninit<T> in Rust is a special wrapper type that allows you to safely work with memory that has not been initialized yet. Normally, Rust enforces that all variables are fully initialized before use to maintain memory safety. However, some situations require allocating memory first and filling it later.
Refactor board's configuration
Because we made fundamental changes to the capsule, we need to make a few modifications in order to run the kernel.
/// Supported drivers by the platform
pub struct Cy8cproto0624343w {
    // ...
    systick: cortexm0p::systick::SysTick,
    mock_capsule: &'static capsules_extra::mock::MockCapsule<
        'static,
        VirtualMuxAlarm<'static, psoc62xa::tcpwm::Tcpwm0<'static>>,
    >,
}

// ...

pub unsafe fn main() {
    // ...

    let mock_capsule = components::mock::MockCapsuleComponent::new(mux_alarm)
        .finalize(components::mock_component_static!(psoc62xa::tcpwm::Tcpwm0));
    mock_capsule.init();

    let cy8cproto0624343w = Cy8cproto0624343w {
        // ...
        gpio,
        // Currently, the CPU runs at 8MHz, that being the frequency of the IMO.
        systick: cortexm0p::systick::SysTick::new_with_calibration(8_000_000),
        mock_capsule
    };

    // ...

}
To test our modifications, as now we no longer need an application, run:
probe-rs erase --chip CY8C624ABZI-S2D44
make flash
Temperature Sensor Capsule
For this task, we will have to read the ambient temperature using the onboard thermistor. A thermistor is a temperature-sensitive resistor in which resistance varies with temperature. The thermistor is in a voltage divider configuration which can be seen bellow:

Given that the current flowing through also flows through the thermistor:
The Steinhart-Hart equation describes the resistance change of a semiconductor thermistor as related to its temperature. The following equation shows it to be a third-order logarithmic polynomial using three constants.
Where , and are empirical constants, is the thermistor's resistance in and is the temperature in kelvin.
Consulting the board's manual, we can see that the voltage divider uses a 10K resistor, so .
Current state
The underlying ADC peripheral implementation has two channels configured (AdcChannel0 and AdcChannel1) to sample on demand the two voltage drops on the resistor and thermistor. Also, the four pins mentioned in the schematic are properly setup by the board configuration, in the TEMPERATURE section.
TemperatureSensor in Tock
Tock already has an implementation for a SyscallDriver capsule for reading the temperature. It can be found in the capsules/extra/src/temperature.rs module. It utilizes a trait for interacting with various temperature sensors called TemperatureDriver, that works in the same notification based paradigm as the Alarm, notifying the client when the temperature measurement is complete. Our goal will be to implement this trait for our new Cy8cprotoThermistor capsule.
As before, the first step will be to define our new module, cy8cproto_thermistor.rs and define the structure of our capsule. The capsule will need references to both AdcChannels, and will need to hold a client reference, to notify them.
pub struct Cy8cprotoThermistor<'a, A: adc::AdcChannel<'a>> {
    thermistor_adc: &'a A,
    resistor_adc: &'a A,
    client: OptionalCell<&'a dyn sensors::TemperatureClient>,
}
We need to implement the TemperatureDriver trait for our thermistor capsule. The implementation for the set_client method is straight-forward, and the read_temperature would, in theory, need to start the sampling of both channels.
impl<'a, A: adc::AdcChannel<'a>> TemperatureDriver<'a> for Cy8cprotoThermistor<'a, A> {
    fn set_client(&self, client: &'a dyn sensors::TemperatureClient) {
        self.client.set(client);
    }

    fn read_temperature(&self) -> Result<(), kernel::ErrorCode> {
        self.thermistor_adc.sample();
        self.resistor_adc.sample();
        Ok(())
    }
}
This implementation disregards error handling for education purposes, both sample functions may fail, and need proper handling.
This capsule will be a client to both the AdcChannels, so the next logical step is to implement the AdcClient trait.
impl<'a, A: adc::AdcChannel<'a>> adc::Client for Cy8cprotoThermistor<'a, A> {
    fn sample_ready(&self, sample: u16) {
        todo!()
    }
}
This is where we encounter our first issue. Both channels will use the same interface, and therefore the same method implementation when the sampling is done. This means that the capsule has no way of distinguishing between the samples.
State machine design
One viable alternative would be implementing a state machine for sampling both channels and computing the temperature.
We need to define the internal state of the capsule, and to do that, we will use an enum. We will also need to store the result of the resistor sample in capsule.
#[derive(Clone, Copy)]
enum Status {
    Idle,
    AwaitingThermistorReading,
    AwaitingResistorReading,
}

pub struct Cy8cprotoThermistor<'a, A: adc::AdcChannel<'a>> {
    thermistor_adc: &'a A,
    resistor_adc: &'a A,
    resistor_sample: OptionalCell<u16>,
    status: Cell<Status>,
    client: OptionalCell<&'a dyn sensors::TemperatureClient>,
}

impl<'a, A: adc::AdcChannel<'a>> Cy8cprotoThermistor<'a, A> {
    pub fn new(thermistor_adc: &'a A, resistor_adc: &'a A) -> Self {
        Self {
            thermistor_adc,
            resistor_adc,
            resistor_sample: OptionalCell::empty(),
            status: Cell::new(Status::Idle),
            client: OptionalCell::empty(),
        }
    }
}
The read_temperature method will start the resistor measurement and will change the inner state.
impl<'a, A: adc::AdcChannel<'a>> TemperatureDriver<'a> for Cy8cprotoThermistor<'a, A> {
    fn set_client(&self, client: &'a dyn sensors::TemperatureClient) {
        self.client.set(client);
    }

    fn read_temperature(&self) -> Result<(), kernel::ErrorCode> {
        let res = self.thermistor_adc.sample();
        if res.is_ok() {
            self.status.set(Status::AwaitingThermistorReading);
        }
        res
    }
}
The implementation of the AdcClient sole method, sample_ready will have to take into account the current state. If the method is called after the first reading (status is Status::AwaitingResistorReading), the capsule must store the result and start the thermistor sampling. If the method is called after both readings are performed, then the capsule must perform the computations mentioned above, to report the measured temperature in hundredths of degrees Celsius (centiCelsius).
Handle all possible errors that the sample calls may yield by resetting both the thermistor state to Status::Idle and the resistor_sample, and reporting the error to the client.
self.client.map(|client| client.callback(temp_reading_result))
In our case, the temp_reading_result will be the sample error.
Computing the temperature
Based on the Infineon documentation, the empirical constants' values for the thermistor used by our board are:
/// Reference Resistor value in Ohms
const R_REF: f64 = 10_000.0;

const A: f64 = 0.000891358;
const B: f64 = 0.000250618;
const C: f64 = 0.000000197;
To convert from the numerical values to voltages, we need to understand how ADCs work. Every ADC will have a resolution, which is the number of bits which can be used to store the sample result, and a sampling range which is the minimum-to-maximum input voltage it can measure. Our ADC has a resolution of 11 bits (based on the current configuration of the peripheral) and a input range of 0-3.3 Volts, meaning that the result can rage from 0, which represents the 0V potential to 2047 () which will represent 3V3.
Based on this, we can define a function that takes the discrete value of the sample and returns the voltage.
fn convert(sample: u16) -> f64 {
    ((sample as f64) * 3.3) / 2047.0
}
Our implementation of the sample_ready function should now be complete
impl<'a, A: adc::AdcChannel<'a>> adc::Client for Cy8cprotoThermistor<'a, A> {
    fn sample_ready(&self, sample: u16) {
        match self.status.get() {
            Status::Idle => (),
            Status::AwaitingResistorReading => {
                // ... Store the sample
            }
            Status::AwaitingThermistorReading => {
                let sample_0 = self.resistor_sample.take().unwrap();
                let sample_1 = sample;

                let v1_0 = convert(sample_0);
                let v2_1 = convert(sample_1);

                let r_therm = R_REF * (v2_1 / v1_0);

                let logarithm = libm::log(r_therm);
                let logarithm3 = logarithm * logarithm * logarithm;

                let temp_k = 1.0f64 / (A + B * logarithm + C * logarithm3);

                let temp_celsius = temp_k - 273.15;

                self.status.set(Status::Idle);
                self.client
                    .map(|client| client.callback(Ok((temp_celsius * 100.0) as i32)));
            }
        }
    }
}
Defining the component
As before, we need to ensure the capsule can be easily configured by implementing a new Component. You can name the module cy8cproto_thermistor.rs.
We should start from the bottom up, considering what should be needed to instantiate this capsule. These are the AdcChannels and an MuxAdc, to be able to multiplex an ADC peripheral to sample multiple channels.
// This will be the output type of the component
pub type Cy8cprotoThermistorComponentType<A> =
    capsules_extra::cy8cproto_thermistor::Cy8cprotoThermistor<'static, A>;

pub struct Cy8cprotoThermistorComponent<A: 'static + adc::Adc<'static>> {
    adc_mux: &'static capsules_core::virtualizers::virtual_adc::MuxAdc<'static, A>,
    thermistor_channel: A::Channel,
    resistor_channel: A::Channel,
}

impl<A: 'static + adc::Adc<'static>> Cy8cprotoThermistorComponent<A> {
    pub fn new(
        adc_mux: &'static capsules_core::virtualizers::virtual_adc::MuxAdc<'static, A>,
        thermistor_channel: A::Channel,
        resistor_channel: A::Channel,
    ) -> Self {
        Self {
            adc_mux,
            thermistor_channel,
            resistor_channel,
        }
    }
}
The finalize implementation of the Component trait will need to create the two virtual AdcDevices that multiplex the peripheral, and therefore, the static memory needed must accommodate the two devices, and the thermistor capsule.
impl<A: 'static + adc::Adc<'static>> Component for Cy8cprotoThermistorComponent<A> {
    type StaticInput = (
        &'static mut MaybeUninit<AdcDevice<'static, A>>,
        &'static mut MaybeUninit<AdcDevice<'static, A>>,
        &'static mut MaybeUninit<Cy8cprotoThermistorComponentType<AdcDevice<'static, A>>>,
    );

    type Output = &'static Cy8cprotoThermistorComponentType<AdcDevice<'static, A>>;

    fn finalize(self, static_memory: Self::StaticInput) -> Self::Output {
        let thermistor_device =
            crate::adc::AdcComponent::new(self.adc_mux, self.thermistor_channel)
                .finalize(static_memory.0);

        let resistor_device = crate::adc::AdcComponent::new(self.adc_mux, self.resistor_channel)
            .finalize(static_memory.1);

        let cy8cproto_thermistor = static_memory.2.write(Cy8cprotoThermistorComponentType::new(
            thermistor_device,
            resistor_device,
        ));

        thermistor_device.set_client(cy8cproto_thermistor);
        resistor_device.set_client(cy8cproto_thermistor);
        cy8cproto_thermistor
    }
}
The macro should look like this:
#[macro_export]
macro_rules! cy8cproto_thermistor_component_static {
    ($A:ty $(,)?) => {{
        let thermistor_device = components::adc_component_static!($A);
        let resistor_device = components::adc_component_static!($A);
        let cy8cproto_thermistor = kernel::static_buf!(
            capsules_extra::cy8cproto_thermistor::Cy8cprotoThermistor<
                'static,
                capsules_core::virtualizers::virtual_adc::AdcDevice<'static, $A>,
            >
        );

        (thermistor_device, resistor_device, cy8cproto_thermistor)
    };};
}
Adding the capsule to the board
The final step is to add the newly defined capsule to the board's configuration. To do that, we must add the capsule
to the Cy8cproto0624343w structure, and to the SyscallDriverLookup implementation, and configure it in the main function.
/// Supported drivers by the platform
pub struct Cy8cproto0624343w {
    // ...
    systick: cortexm0p::systick::SysTick,
    temp: &'static capsules_extra::temperature::TemperatureSensor<
        'static,
        capsules_extra::cy8cproto_thermistor::Cy8cprotoThermistor<
            'static,
            capsules_core::virtualizers::virtual_adc::AdcDevice<'static, Adc<'static>>,
        >,
    >,
}

impl SyscallDriverLookup for Cy8cproto0624343w {
    fn with_driver<F, R>(&self, driver_num: usize, f: F) -> R
    where
        F: FnOnce(Option<&dyn kernel::syscall::SyscallDriver>) -> R,
    {
        match driver_num {
            // ...
            capsules_core::gpio::DRIVER_NUM => f(Some(self.gpio)),
            capsules_extra::temperature::DRIVER_NUM => f(Some(self.temp)),
            _ => f(None),
        }
    }
}

// ...

pub unsafe fn main() {
    // ...

    //--------------------------------------------------------------------------
    // TEMPERATURE
    //--------------------------------------------------------------------------

    // ... Pin configurations

    let mux_adc = components::adc::AdcMuxComponent::new(&peripherals.adc)
        .finalize(components::adc_mux_component_static!(sar::Adc));

    let thermistor = components::cy8cproto_thermistor::Cy8cprotoThermistorComponent::new(
        mux_adc,
        sar::AdcChannel::Channel0,
        sar::AdcChannel::Channel1,
    )
    .finalize(cy8cproto_thermistor_component_static!(psoc62xa::sar::Adc));

    let temp = components::temperature::TemperatureComponent::new(
        board_kernel,
        capsules_extra::temperature::DRIVER_NUM,
        thermistor,
    )
    .finalize(components::temperature_component_static!(
        capsules_extra::cy8cproto_thermistor::Cy8cprotoThermistor<
            'static,
            capsules_core::virtualizers::virtual_adc::AdcDevice<'static, Adc<'static>>,
        >
    ));

    // ...
}
Sensors application
Fortunately, libtock-c already has a modular example that reads multiple sensors. This example can be found in the examples/sensors subdirectory. To enable the temperature readings, we must set the temperature variable.
// ...
#include <libtock/tock.h>

static libtock_alarm_t alarm;
static bool light          = false;
static bool temperature    = true;
static bool humidity       = false;
static bool ninedof        = false;
static bool ninedof_accel  = false;
static bool ninedof_mag    = false;
static bool ninedof_gyro   = false;
static bool proximity      = false;
static bool sound_pressure = false;
static bool moisture       = false;
static bool rainfall       = false;
Then, compile the application, and flash it along the kernel. Do not forget to update the APP variable in the board's Makefile.