Radar App
Prerequisites
- Raspberry Pi Pico W with MicroPython
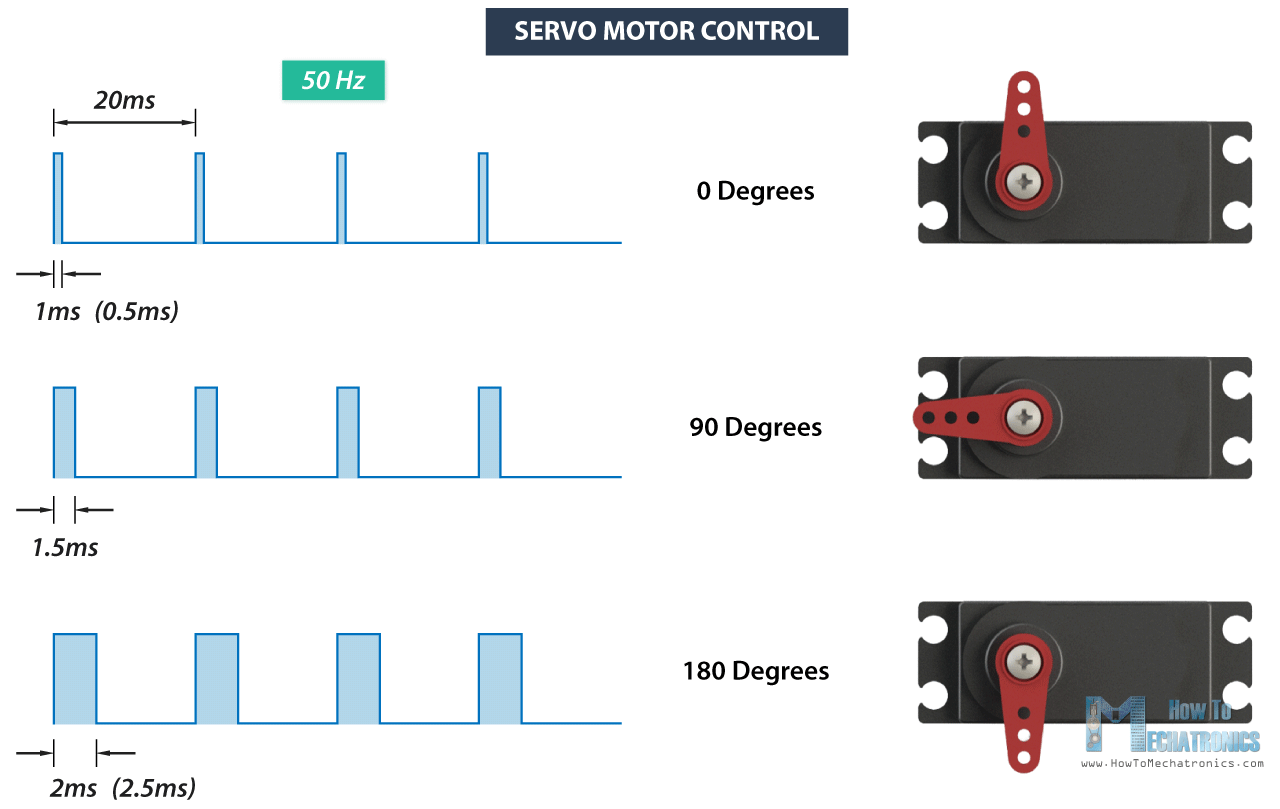
- Servo
- Ultrasonic distance sensor
- Android phone (App Inventor Companion app installed)
- Basic familiarity with the previous Wi-Fi lesson (connecting Pico W & HTTP)
Wiring
-
Servo:
- Brown/Black (GND) -> GND
- Red (V+) -> 3V3
- Orange/Yellow (signal) -> GP3 (you can choose another PWM-capable pin)
-
Ultrasonic Distance Sensor:
- TRIG -> GP4
- ECHO -> GP5
- VCC -> 3V3
- GND -> GND
Part 1 - Pico W Firmware (HTTP API)
1.1 Servo helper
from machine import Pin, PWM

class Servo:
    def __init__(self, pin=3, min_us=500, max_us=2500, freq=50):
        self.pwm = PWM(Pin(pin))
        self.pwm.freq(freq)
        self.min_us = min_us
        self.max_us = max_us
        self.us_range = max_us - min_us

    def angle(self, deg):
        deg = max(0, min(180, int(deg)))
        us = self.min_us + self.us_range * deg // 180
        # duty_u16 for RP2040: duty = us / period * 65535
        period_us = 1_000_000 // self.pwm.freq()   # 20,000 us at 50 Hz
        duty = int(us * 65535 // period_us)
        self.pwm.duty_u16(duty)
1.2 Ultrasonic distance helper
from machine import Pin, time_pulse_us
import time
class Ultrasonic:
def __init__(self, trig_pin=4, echo_pin=5, timeout_us=30000):
self.trig = Pin(trig_pin, Pin.OUT)
self.echo = Pin(echo_pin, Pin.IN)
self.timeout_us = timeout_us
self.trig.value(0)
time.sleep_ms(50)
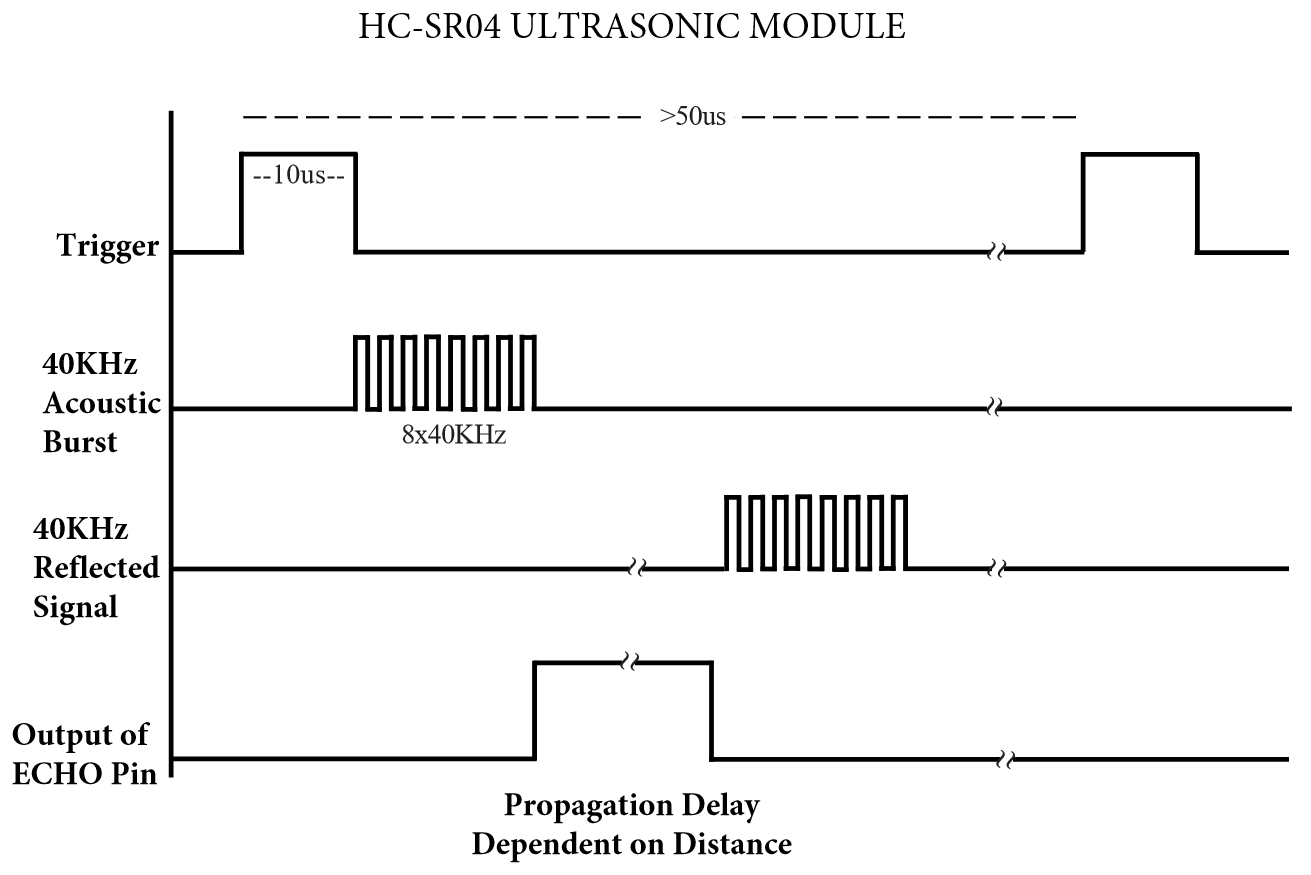
def measure_cm(self):
# 10 us trigger pulse
self.trig.value(0)
time.sleep_us(2)
self.trig.value(1)
time.sleep_us(10)
self.trig.value(0)
# measure echo high pulse (us); -2/-1 indicate timeout
t = time_pulse_us(self.echo, 1, self.timeout_us)
if t < 0:
return None
# distance = speed of sound * time / 2
return 343 * t * 1e-4 / 2
1.3 HTTP server
Using the helpers and what you learned last lesson, write a HTTP server for controlling the servo and getting distance data.
Part 2 - Build the MIT App Inventor App
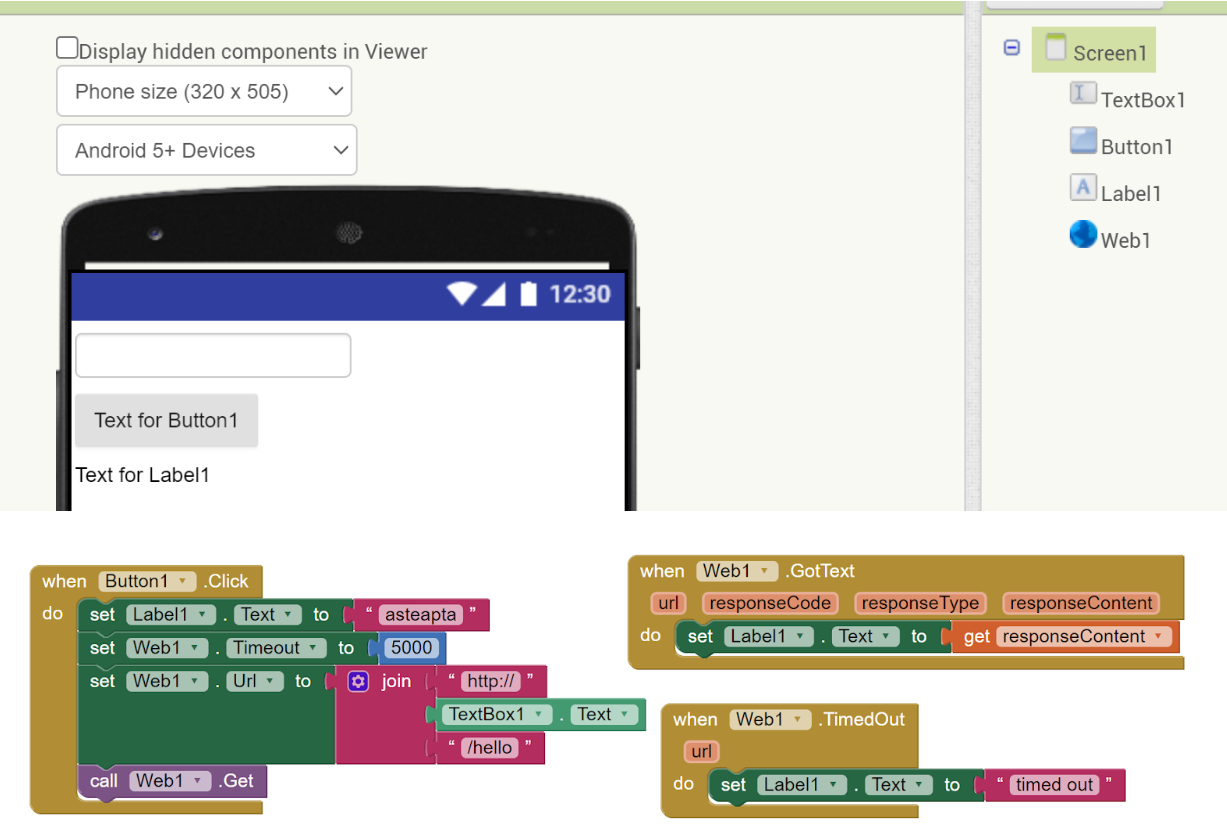
2.1 Designer (UI components)
Open appinventor.mit.edu -> Create Apps -> new project.
Add these components:
- User Interface
Label(Title: Moving Radar")TextBox(Hint:Pico IP,Textdefault your Pico IP, e.g.192.168.1.50)Slider(Min=0,Max=180,ThumbPosition=90) -> for angleLabel(Name:LabelAngle, Text:Angle: 90)Button(Text="Set Angle")Button(Text="Scan")Label(Name:LabelDistance, Text:Distance: -- cm)Canvas(Width=Fill parent,Height=200) -> simple chart area
- Connectivity
Web(Name:Web1)
- Sensors (optional)
Clock(TimerInterval=500,Enabled=true) -> poll distance every 0.5s
Optional: use the built-in Charts component (Category "Experimental") instead of Canvas if available to you. Below we'll use Canvas for broad compatibility.
2.2 Blocks - Configuration
- Create a helper block to build a base URL:
procedureBaseURL-> returns"http://" + TextBoxPicoIP.Text
2.3 Blocks - Set angle
- Slider.PositionChanged -> set
LabelAngle.Textto"Angle: " + round(position) - ButtonSetAngle.Click:
Web1.Url = BaseURL() + "/servo?angle=" + round(Slider.ThumbPosition)call Web1.Get
2.4 Blocks - Poll distance (Clock)
- Clock.Timer:
Web1.Url = BaseURL() + "/distance"call Web1.Get
2.5 Blocks - Handle responses
- Web1.GotText
(url, responseCode, responseType, responseContent)- If
responseCode = 200andresponseTypecontains"application/json":local obj = call JsonTextDecode(responseContent)- If URL contains
"/distance":LabelDistance.Text = "Distance: " + round(obj["cm"]) + " cm"- Plot this value on the Canvas (see next).
- If URL contains
"/scan":- Clear Canvas, iterate
obj["points"]list, draw a polyline (angle on X, cm on Y).
- Clear Canvas, iterate
- Optionally, if URL contains
"/servo": update angle label.
- If
2.6 Drawing on Canvas (simple chart)
Create procedures:
CanvasClear:call Canvas.Clear, draw axes:- X axis: angle 0->180 mapped to canvas width
- Y axis: 10->80 cm mapped to canvas height (invert y so 10 cm is near bottom or top as you prefer)
PlotPoint(angle, cm):x = angle / 180 * Canvas.Widthy = map(cm, 10..80 -> Canvas.Height..0)(linear map)call Canvas.DrawCircle(x, y, 2)
PlotPolylineFromList(points):- loop i=1..len-1: draw line from previous point to current
(x1,y1) -> (x2,y2)
- loop i=1..len-1: draw line from previous point to current
Use these in:
- Web1.GotText when handling
/distanceor/scan - ButtonScan.Click:
Web1.Url = BaseURL() + "/scan?n=19"CanvasClear()Web1.Get
Part 3 - Try It
- Flash the Pico code, note its IP in the REPL.
- In App Inventor, connect the AI2 Companion on your Android phone.
- Enter the Pico's IP in the
TextBox. - Move the slider -> tap Set Angle -> servo should move.
- Watch Distance label update every ~0.5s.
- Tap Scan -> servo sweeps; a profile appears on the Canvas.
Exercise
- Turn the Pico into a remote music player, with a play/pause button on the phone.
Optional: Using Flask as a Relay (Bonus)
If you built the previous Flask lesson, you can point the app to a Flask relay on your laptop, which then proxies to the Pico.